
Deploying Power BI in Conjunction with SharePoint Online
Over the years, organizations rely on tools like Power BI for interactive dashboards in decision-making. In this blog post, I’ll explore using Power BI to create reports from SharePoint Online Lists. First, let’s discuss the benefits of using Power BI for efficient data analysis.
Additionally, we’ll explore the steps involved in establishing a connection between Power BI and SharePoint Online Lists. This includes the pivotal task of importing SharePoint List data into PowerBI, a crucial phase in the process.
Moving on, we’ll explore creating SharePoint reports with PowerBI, highlighting its data analysis enhancements. We’ll explore customizing and sharing Power BI reports in SharePoint, fostering collaboration and knowledge sharing among team members.
To kick things off, let’s start by understanding the following key components:
Power BI Services
PowerBI constitutes a comprehensive set of business analytics tools that empower organizations to seamlessly visualize data and disseminate insights in a user-friendly fashion. Power BI Services enables collaborative publishing and sharing of Power BI Desktop reports and dashboards.
SharePoint Online
SharePoint Online serves as a cloud-based collaboration platform, offering a central hub for document management, communication, and collaboration. It includes features like lists, workflows, document libraries, and integration with Microsoft 365 services.
Now, let’s delve into the integration benefits that arise when combining PowerBI Services with SharePoint Online:
- Centralized Data Repository: SharePoint Online serves as a centralized repository for storing data sources, making it easy to access and manage data from a single location.
- Seamless Collaboration: Embedding Power BI in SharePoint promotes collaboration, granting team members access to real-time data insights.
- Enhanced Data Security: SharePoint Online provides robust security features, ensuring that sensitive data used in Power BI reports is protected and accessible only to authorized users.
- Automation and Workflow: SharePoint Online workflows can trigger actions based on Power BI data, such as sending notifications or updating documents when specific thresholds are met.
- Customization: Customize SharePoint Online to align with your branding for seamless Power BI report access and a unified user experience.
Now, let’s proceed to discuss the implementation steps involved in connecting Power BI to SharePoint Online Lists.
Step 1: Launch Power BI Desktop
To initiate the process, ensure access to PowerBI Desktop and the relevant SharePoint Online site housing your target list. With these prerequisites in place, let’s delve into the sequential steps. These steps are necessary to establish a seamless connection between Power BI and your SharePoint Online List.
Step 2: Retrieve the SharePoint Site URL
Navigate to your SharePoint site and pinpoint the specific list you intend to connect with. After finding the list, copy the URL from your browser’s address bar. Ensure you copy only the base URL, excluding any additional elements like “/Lists” or “/AllItems.aspx.” For instance, the URL should resemble something like this: “https://crescent.sharepoint.com/sites/operations.”
Step 3: Initiate the Connection to SharePoint Online List
Now, within the PowerBI Desktop application, navigate to the Home tab on the ribbon and click on the “Get Data” button. This pivotal step will initiate the process of connecting Power BI to your chosen SharePoint Online List.
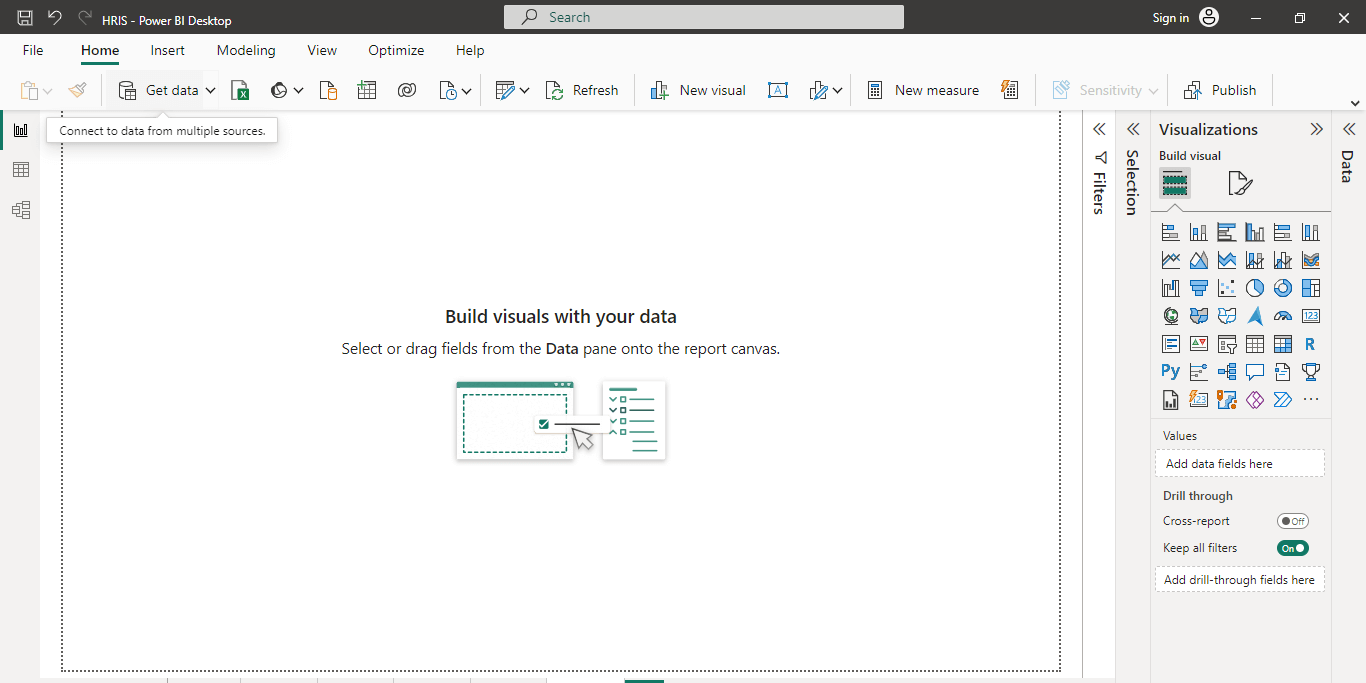
Step 4: Choose “SharePoint Online List” as the Data Source
Within the upcoming window, efficiently locate the desired data source by typing “SharePoint” into the search bar. Subsequently, opt for “SharePoint Online List.” Once selected, proceed by clicking on the “Connect” button.
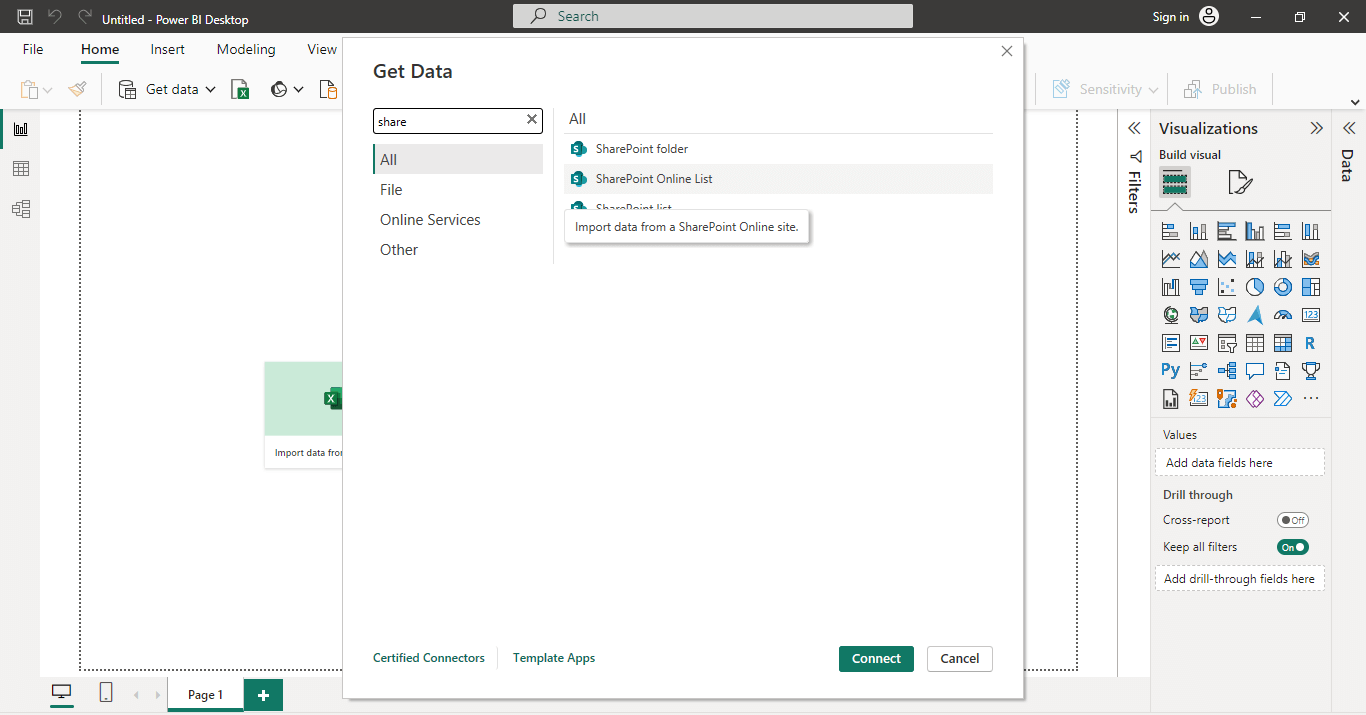
Step 5: Provide the SharePoint Site URL
In the ensuing window, proceed to paste the SharePoint site URL that you previously copied. This step is critical for establishing the connection. After pasting the URL, simply click “OK.”
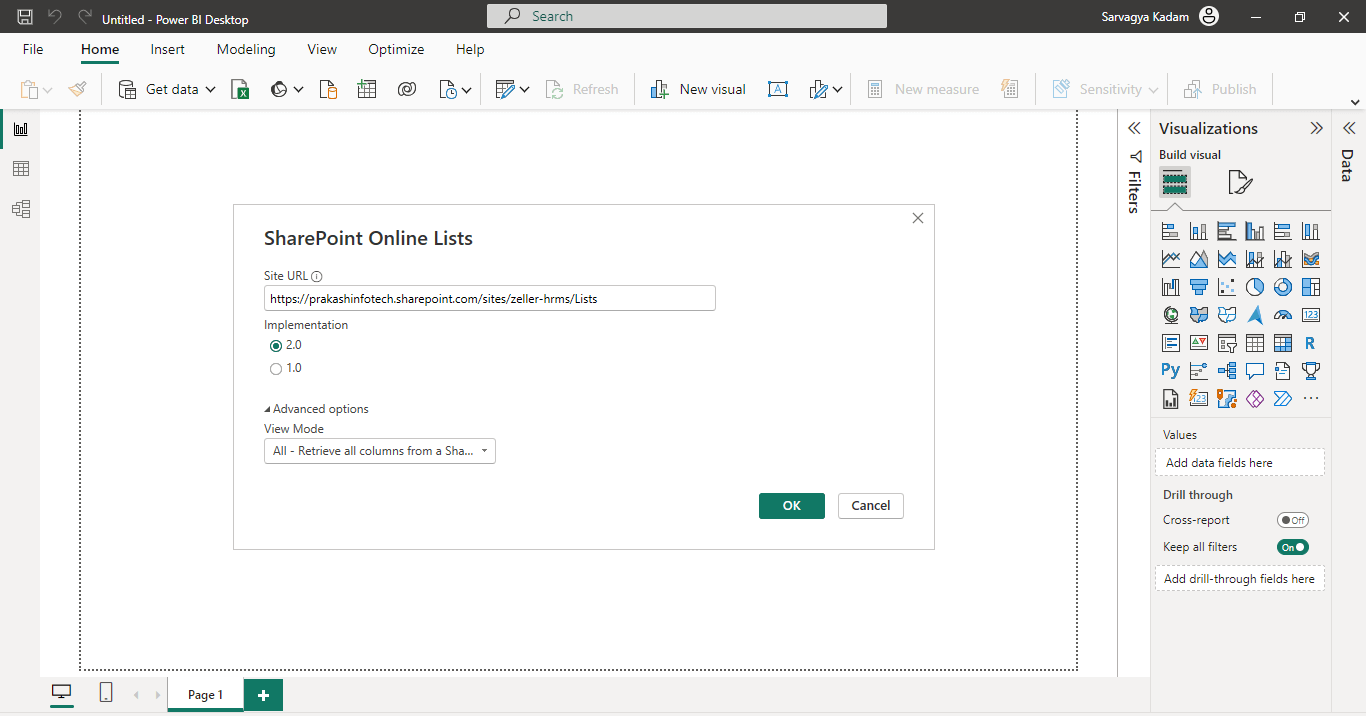
Step 6: Sign In
Begin by signing in, where you’ll be asked for your Microsoft account credentials to access the SharePoint list.
Step 7: Select the List and Load Data
After successful authentication and connection, PowerBI will present a Navigator window. In this section, you’ll discover a detailed list of all accessible lists and libraries in your SharePoint site.
To continue, pick the desired list and select the “Load” choice. With this step completed, you’re poised to import data into Power BI and commence the creation of reports using the SharePoint dataset.
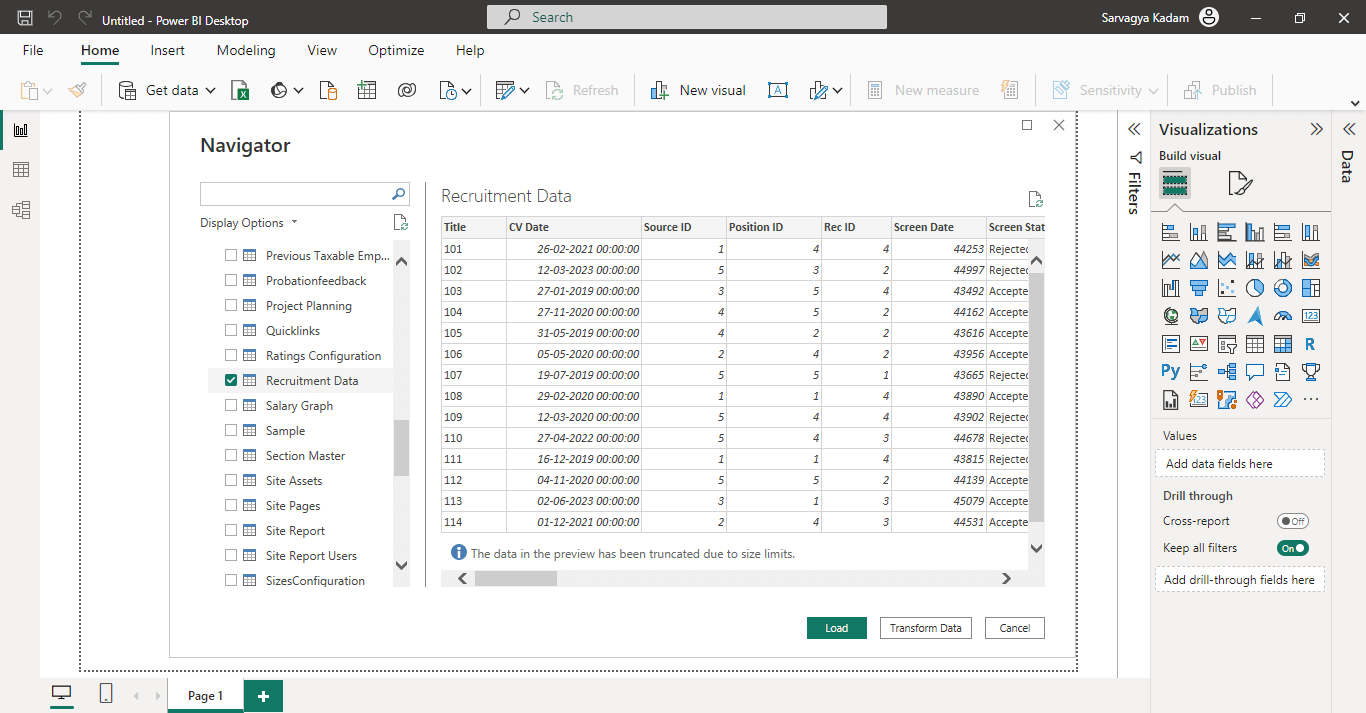
Step 8: Add Widgets to the Page
Enhance your report’s visual appeal by incorporating widgets like Tables, Charts, and more. Access these widgets by clicking the relevant icons found in the “Visualizations” pane on the page.
Step 9: Select Fields to Display
Efficiently manage the data fields you want to include in your report by utilizing the “Fields” pane located on the right side of the screen.
Effortlessly move the preferred fields onto the report canvas using a simple drag-and-drop action. Ensure you choose the appropriate data value for each visualization corresponding to the selected field. Additionally, you can easily modify data visualizations, and if necessary, rename column headers.
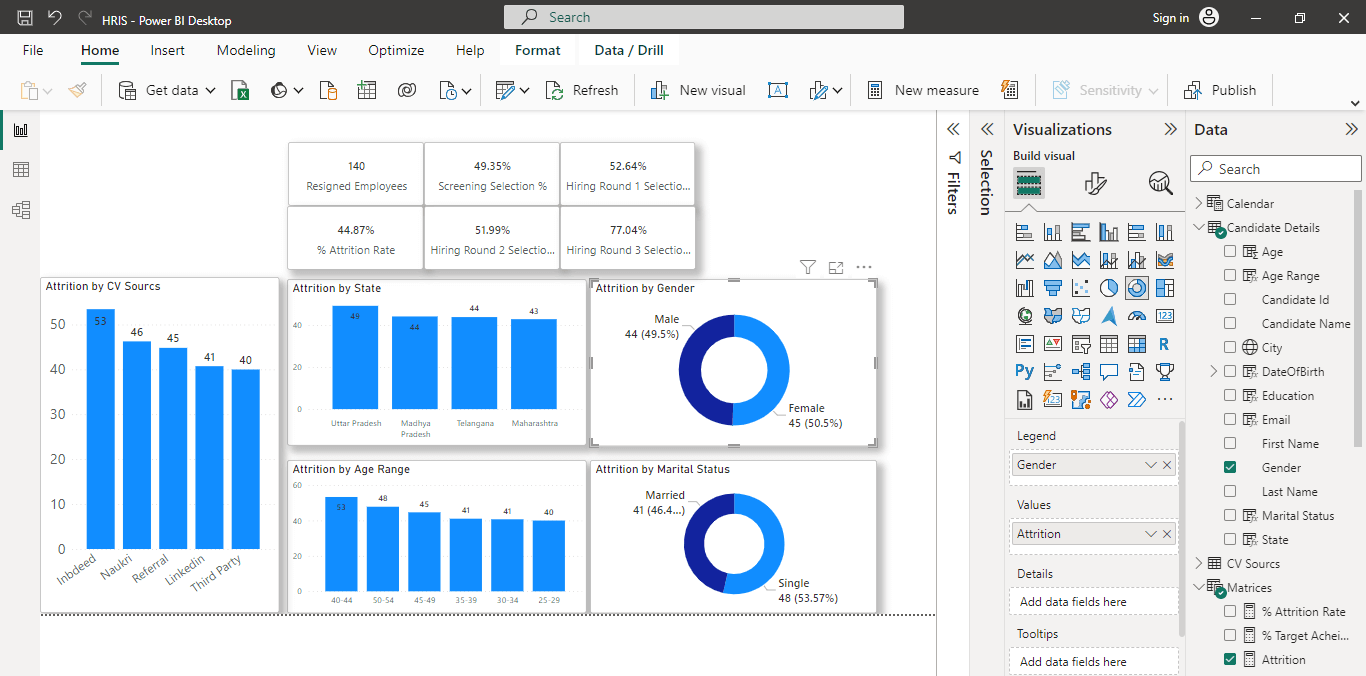
Step 10: Customize the Report as Needed
Tailor your report to meet specific requirements by adding titles, legends, and applying formatting. Further customization options include incorporating filters, slicers, and interactive elements. Fine-tune details such as colors, fonts, and other formatting aspects to align the report with your organization’s branding.
Step 11: Save and Publish the Report
Once your PowerBI report is complete, ensure you save it and proceed to publish it. Sharing your report becomes effortless at this stage, as you can easily distribute it to others for review and interaction.
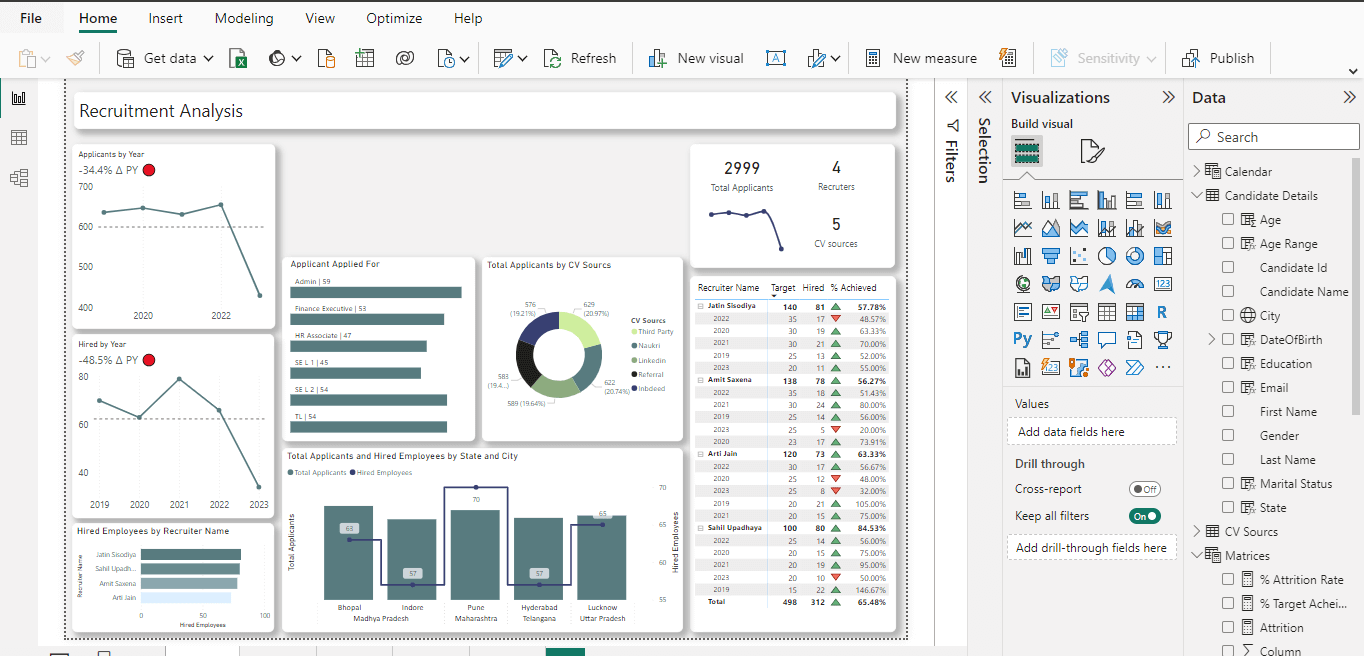
Step 12: Share Your Report
To share your meticulously crafted report with a broader audience, consider publishing it to your workspace on Power BI Services. This step ensures that colleagues within your organization can access and interact with the report, fostering effective collaboration and decision-making.
By meticulously following these detailed steps, you can successfully create and share your Power BI report. Streamlining data analysis with Power BI and SharePoint Online enhances decision-making for your organization’s full potential.
Wrapping Up
In conclusion, integrating Power BI Services with SharePoint Online offers organizations a powerful solution for data analysis, visualization, and collaboration.
Leveraging SharePoint Online’s collaboration with PowerBI’s analytics unlocks insights, fostering efficient data-driven decisions. This integration enhances security, promotes a data-driven culture, and boosts business outcomes across the organization.
In a world where organizations increasingly recognize the importance of data, the synergy between Power BI Services and SharePoint Online is vital for success and innovation.
Happy Reading!


